Inbound filtering
Basic steps to protect your domain:
- Ensure the destination route is set to the MX record hostname provided by Office 365.
- Add a rule to Office365 to ensure email from the filtering servers is always accepted and not wrongly classified as spam.
- Change the MX records of the domain in the DNS to point to the SpamHitman provided MX record hostnames.
X Header based rule to accept email from the filtering servers
- Login to the Office 365 "Exchange admin center".
- In the Dashboard, select Rules in the Mail Flow section
- Under Rules, click the + button and choose Create a new rule... .
- Enter a Name for your rule, e.g. 'SpaHitman spamfilter bypass'.
- Click More Options.
- Create Rule "A message header includes"X-Recommended-Action" header includes >> contains "accept".
- Click +.
- Click OK.
- In the "Do the following" part, select "Modify the message properties" >> "Set the spam confidence level (SCL)" >> "Specify SCL" >> "Bypass spam filtering".
- Click OK.
Outbound filtering
Basic steps to protect your domain's outbound mailflow, you need to:
- Add your sender Office365 sender domain as an "Authenticating Domain", with "Re-authentication permitted:" explicitly set
- Setup a connector in Office 365 to relay the outgoing email via the email security smarthost
Setup outbound user in SpamHitman
- Go to the domain dashboard, choose Outgoing > Manage Users.
- At the bottom of the page, select the "Authenticating Domain" tab. Specify your Office365 sending domain, and provide a secure random password.
- Once the user has been added, click the dropdown icon on the left of the user and select "Edit".
- Verify the configuration and ensure the limits are either disabled or match your expected traffic.
- Ensure "Re-authentication permitted" is selected. This is required for the sending domain to be allowed from Office365.
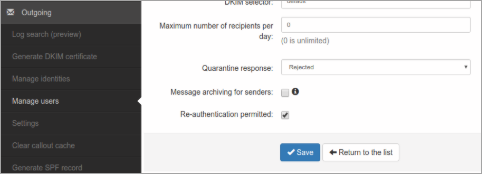
- Save the user settings.
Setup a transport rule in Office 365
- Login to the Office365 "Exchange admin center".
- In the dashboard, go to Connectors in the Mail Flow section.
- Create a new connector from Office365 to Partner Organization and give it a name.
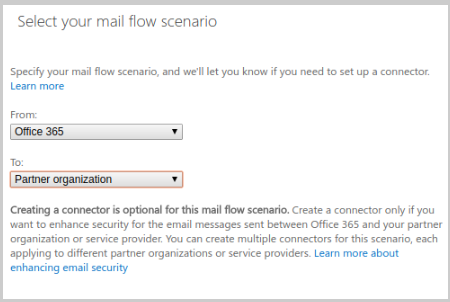
- Select Only when I have a transport rule set up that redirects messages to this connector.
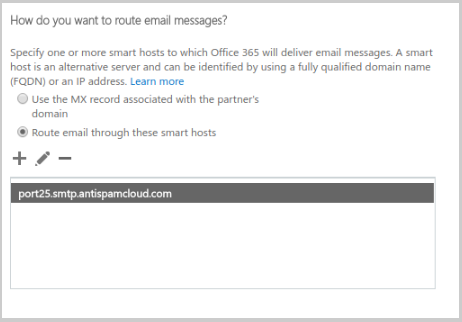
- Select "Route email through these smart hosts" and add port25.smtp.antispamcloud.com.
- Check Always use Transport Layer Security (TLS) to secure the connection (recommended) and select Issued by a trusted certificate authority (CA).

- Validate the connector (e.g. using recipient [email protected]) and save.
- In the Exchange Dashboard, go to Rules in the Mail Flow section.
- Under Rules, click the + button and choose Create a new rule... .
- Enter a Name for your rule, e.g. 'Route sending domain via filtering smarthost'.
- Click More Options.
- Set "Apply this rule if..." to "The sender's domain is...".
- Specify as sender domain the domain you previously added as an "Authentication Domain" outgoing user to SpamHitman (similarly you could setup a rule for specific senders addresses only).
- Set "Do the following..." to "Redirect the message to", "The following connector".
- Set the smarthost connector you previous created.
- Save the rule.
Once this is done, any traffic matching your outgoing sender domain is relayed via the transport rule and be processed by the filtering servers.